
|
|
March 2002 |
|
Adding Buttons to DBGrid Steve Zimmelman The DBGrid is very handy and provides a convenient interface for most tasks. But you may find that it falls short when you try to implement certain bells and whistles. For example, adding components like SpeedButtons or SpinButtons to your grid could really spice up the application. But how do you do it? Steve Zimmelman offers a simple technique. To add buttons to a DBGrid, you really need a more flexible DBGrid. So the first step is to subclass the TDBGrid and expose some of its methods and properties (see the code block that follows). In order to place the button in the proper cell coordinate, you'll need to know the current row and the CellRect of the Cell that's being displayed. While you're at it, you could put a wrapper around the DefaultRowHeight property so you can change the grid's row height for a more accommodating look. The key event that you'll use to display the button is the OnDrawColumnCell. But the event's parameter, Rect (a type of TRect), doesn't always work properly for your needs. That's because the Rect is of the Cell that's being drawn, and you need the Data Cell that's identified by the Row property.
unit DBGridObj;
  interface

  uses Windows, Messages, SysUtils, Classes, Graphics,
       Controls, Forms,Grids, dbGrids;

 Type
  TDBGridObj = class(TDBGrid)

  Private
    FRowHeight : Integer ;
    Protected
    Procedure
    SetRowHeight(Value:Integer);
  Public
    // The inherited method is declared as protected.
    // Used Reintroduce to hide compiler warnings.
    Function CellRect(ACol,Arow : Longint):TRect; Reintroduce;

    // Expose Row and Col properties
    Property Row ;
    Property Col ;
  Published
    Property RowHeight : Integer
       Read FRowHeight Write SetRowHeight ;
  End;

procedure Register;

implementation
  Uses DB ;

Function TDBGridObj.CellRect(ACol,ARow:Longint):TRect;
Begin
   Result := Inherited CellRect(ACol, ARow);
End;

Procedure TDBGridObj.SetRowHeight(Value:Integer);
Begin
   If FRowHeight <> Value Then Begin
      FRowHeight := Value ;
      DefaultRowHeight := FRowHeight ;
      // Force Grid to update the RowCount.
      // The method I need to call is
      // UpdateRowCount, but it's declared
      // as private in the parent.  This
      // calls it by making the grid think it has
      // been resized.
      If Self.DataLink.Active Then Begin
         Perform(WM_SIZE,0,0);
     End;
   End;
End;

procedure Register;
Begin
   RegisterComponents('Custom', [TDBGridObj]);
End;

End.
Now that you have a DBGrid that can accommodate your needs, you can add some buttons to it. Place the new TDBGridObj on a form and create an OnDrawColumnCell event. Place a SpeedButton anywhere on the form. The following code is rough, and you may not want to use it exactly as-is in an application, but it provides a good example of how this comes together. I use the Index property of the Column parameter to identify the Column I want to place the button in. The placement of the button is obtained by some simple calculations based on the Current Data Cell's Rect.
procedure TForm1.DBGridObj1DrawColumnCell(Sender: TObject; const Rect: TRect;
                                          DataCol: Integer; Column: TColumn;
                                          State: TGridDrawState);
Var DataRect : TRect ;
Begin
   // Place the button in the first column.
   If (Column.Index = 0) Then Begin
      With ButtonDBGrid1 Do Begin
         DataRect := CellRect(Column.Index,Row);
      End;
   // Assign the button's parent to the grid.
   If SpeedButton1.Parent <> ButtonDBGrid1 Then
      SpeedButton1.Parent := ButtonDBGrid1 ;
   // Set the button's coordinates.
   // In this case, right justify the button.
   If SpeedButton1.Left <> (DataRect.Right - SpeedButton1.Width) Then
      SpeedButton1.Left := (DataRect.Right - SpeedButton1.Width) ;
   If (SpeedButton1.Top <> DataRect.Top) Then
      SpeedButton1.Top := DataRect.Top ;

   // Make sure the button's height fits in row.
   If (SpeedButton1.Height <> (DataRect.Bottom-DataRect.Top)) Then
      SpeedButton1.Height := (DataRect.Bottom-DataRect.Top);

   End;
End;
And that's all there is to it! You can use TSpinButtons the same way, with one exception: Set the SpinButton's Ctl3D property to False. Otherwise, it leaves a dark border on the top and bottom lines of the cell. Using this method, your grids can look like this: 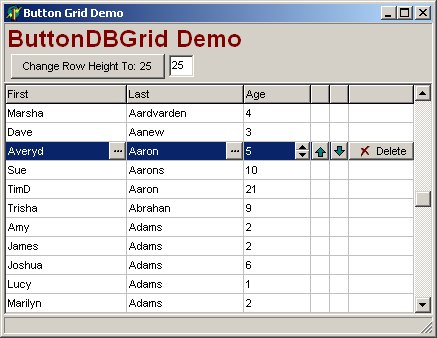
You can use this as a blueprint, but a more
complete method would be to encapsulate the buttons using TCollection and
TCollectionItem. The Download file for this article contains a
TCollection example. |
